
The Perfect Gel Manicure Starts With…?
Imagine this moment: you sit down with your favorite cup of coffee, lay out your gel polishes, lamp, files, and already feel excited about a new nail color. But then… after a few days, chips appear, the gel peels off in patches, and your nails look tired. Sound familiar? As a copywriter with over 10 years of experience in the beauty & wellness industry, specializing in nail care and gel manicures, I know that the secret to a long-lasting and healthy gel manicure lies in one often overlooked step. Today, I’ll reveal what you need to do so your gel nails stay beautiful, strong, and grateful for every styling session!
Why Doesn’t Your Gel Manicure Last As It Should?
Before we get to that key step, ask yourself: have you ever struggled with gel durability? Chips, lifting polish, splitting nail plates it’s not just about the product, but mostly about… nail preparation. Even the most expensive gel polishes won’t work if you skip the basics of nail styling.
That One Step You Cannot Skip: NAIL DEGREASING
Yes! Degreasing the nail plate is an absolute must before every gel manicure. This step determines whether your gel polish will last for weeks or peel off after just a few days.
Why is degreasing so important?
- Removes natural oils, creams, and dust from the nail surface.
- Increases adhesion of the base and gel polish.
- Minimizes the risk of air bubbles and chipping.
- Protects against bacteria and fungi developing under the gel.
Step by Step: How to Properly Degrease Nails Before Gel Polish?
- Start by thoroughly washing your hands – remove all traces of creams and oils.
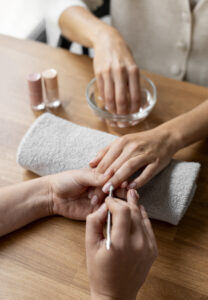
- Push back and remove cuticles – preferably using a cuticle remover and a wooden stick.
- Buff the nail plate with a buffer block – gently, so you don’t damage the nail.
- Remove dust with a brush – don’t touch the nail plate with your fingers!
- Use a cleaner or special degreaser – soak a lint-free wipe and thoroughly wipe each nail.
- Avoid touching nails after degreasing – immediately proceed to applying the base.
Common Mistakes When Degreasing Gel Nails
- Using regular nail polish remover instead of a cleaner – removers may contain oils that worsen gel adhesion.
- Touching the nail plate after degreasing – even a light touch transfers oils and bacteria.
- Skipping this step in a hurry – degreasing is not a place for shortcuts!
- Buffing the nail plate too aggressively – can weaken and increase brittleness.
Recommended Products
- Nail cleaner – preferably with isopropyl alcohol.
- Lint-free wipes – to avoid fibers on the nail plate.
- Fine-grit buffer block – gentle and non-damaging.
- Cuticle remover – helps push back and remove dead skin.
- High-quality gel base – ideally enriched with vitamins.
Expert Recommendations
- Never skip nail degreasing – even if you’re in a rush!
- Use trusted cleaners and wipes – it’s an investment in gel durability.
- Moisturize your nails and cuticles regularly – hydration is key.
- Give your nails breaks from gel polish – allow the plate to rest and regenerate.
- Get inspired by trends but remember the basics – durability starts with good habits!
Frequently Asked Questions About Nail Degreasing
Can I use spirit (alcohol) instead of cleaner?
You can, but cleaners are safer and less drying for the nail plate.
What if my gel still doesn’t last?
Check if you’re skipping other prep steps (like buffing) or using low-quality products.
Is degreasing necessary for every gel manicure?
Yes! It’s the foundation of a long-lasting nail styling.
Don’t do a gel manicure without degreasing your nails will truly thank you! This one step makes your gel manicure durable, beautiful, and safe for your nail plate. Take care of your gel nails from the ground up, and nail styling will become your favorite form of self-care.
What about you? Do you always degrease your nails before gel polish? Do you have your own tried-and-true tricks for long-lasting gel manicures? Share in the comments and inspire other gel manicure lovers!